- Add 'mix' mode to QueryParam for hybrid search functionality
- Implement mix_kg_vector_query to combine knowledge graph and vector search results
- Update LightRAG class to handle 'mix' mode queries
- Enhance README with examples and explanations for the new mix search mode
- Introduce new prompt structure for generating responses based on combined search results
1318 lines
49 KiB
Markdown
1318 lines
49 KiB
Markdown
<center><h2>🚀 LightRAG: Simple and Fast Retrieval-Augmented Generation</h2></center>
|
||
|
||
|
||

|
||
|
||
<div align='center'>
|
||
<p>
|
||
<a href='https://lightrag.github.io'><img src='https://img.shields.io/badge/Project-Page-Green'></a>
|
||
<a href='https://youtu.be/oageL-1I0GE'><img src='https://badges.aleen42.com/src/youtube.svg'></a>
|
||
<a href='https://arxiv.org/abs/2410.05779'><img src='https://img.shields.io/badge/arXiv-2410.05779-b31b1b'></a>
|
||
<a href='https://learnopencv.com/lightrag'><img src='https://img.shields.io/badge/LearnOpenCV-blue'></a>
|
||
</p>
|
||
<p>
|
||
<img src='https://img.shields.io/github/stars/hkuds/lightrag?color=green&style=social' />
|
||
<img src="https://img.shields.io/badge/python->=3.10-blue">
|
||
<a href="https://pypi.org/project/lightrag-hku/"><img src="https://img.shields.io/pypi/v/lightrag-hku.svg"></a>
|
||
<a href="https://pepy.tech/project/lightrag-hku"><img src="https://static.pepy.tech/badge/lightrag-hku/month"></a>
|
||
</p>
|
||
<p>
|
||
<a href='https://discord.gg/yF2MmDJyGJ'><img src='https://discordapp.com/api/guilds/1296348098003734629/widget.png?style=shield'></a>
|
||
<a href='https://github.com/HKUDS/LightRAG/issues/285'><img src='https://img.shields.io/badge/群聊-wechat-green'></a>
|
||
</p>
|
||
|
||
This repository hosts the code of LightRAG. The structure of this code is based on [nano-graphrag](https://github.com/gusye1234/nano-graphrag).
|
||
|
||
</div>
|
||
|
||
## 🎉 News
|
||
- [x] [2024.11.25]🎯📢LightRAG now supports seamless integration of [custom knowledge graphs](https://github.com/HKUDS/LightRAG?tab=readme-ov-file#insert-custom-kg), empowering users to enhance the system with their own domain expertise.
|
||
- [x] [2024.11.19]🎯📢A comprehensive guide to LightRAG is now available on [LearnOpenCV](https://learnopencv.com/lightrag). Many thanks to the blog author.
|
||
- [x] [2024.11.12]🎯📢LightRAG now supports [Oracle Database 23ai for all storage types (KV, vector, and graph)](https://github.com/HKUDS/LightRAG/blob/main/examples/lightrag_oracle_demo.py).
|
||
- [x] [2024.11.11]🎯📢LightRAG now supports [deleting entities by their names](https://github.com/HKUDS/LightRAG?tab=readme-ov-file#delete-entity).
|
||
- [x] [2024.11.09]🎯📢Introducing the [LightRAG Gui](https://lightrag-gui.streamlit.app), which allows you to insert, query, visualize, and download LightRAG knowledge.
|
||
- [x] [2024.11.04]🎯📢You can now [use Neo4J for Storage](https://github.com/HKUDS/LightRAG?tab=readme-ov-file#using-neo4j-for-storage).
|
||
- [x] [2024.10.29]🎯📢LightRAG now supports multiple file types, including PDF, DOC, PPT, and CSV via `textract`.
|
||
- [x] [2024.10.20]🎯📢We’ve added a new feature to LightRAG: Graph Visualization.
|
||
- [x] [2024.10.18]🎯📢We’ve added a link to a [LightRAG Introduction Video](https://youtu.be/oageL-1I0GE). Thanks to the author!
|
||
- [x] [2024.10.17]🎯📢We have created a [Discord channel](https://discord.gg/yF2MmDJyGJ)! Welcome to join for sharing and discussions! 🎉🎉
|
||
- [x] [2024.10.16]🎯📢LightRAG now supports [Ollama models](https://github.com/HKUDS/LightRAG?tab=readme-ov-file#quick-start)!
|
||
- [x] [2024.10.15]🎯📢LightRAG now supports [Hugging Face models](https://github.com/HKUDS/LightRAG?tab=readme-ov-file#quick-start)!
|
||
|
||
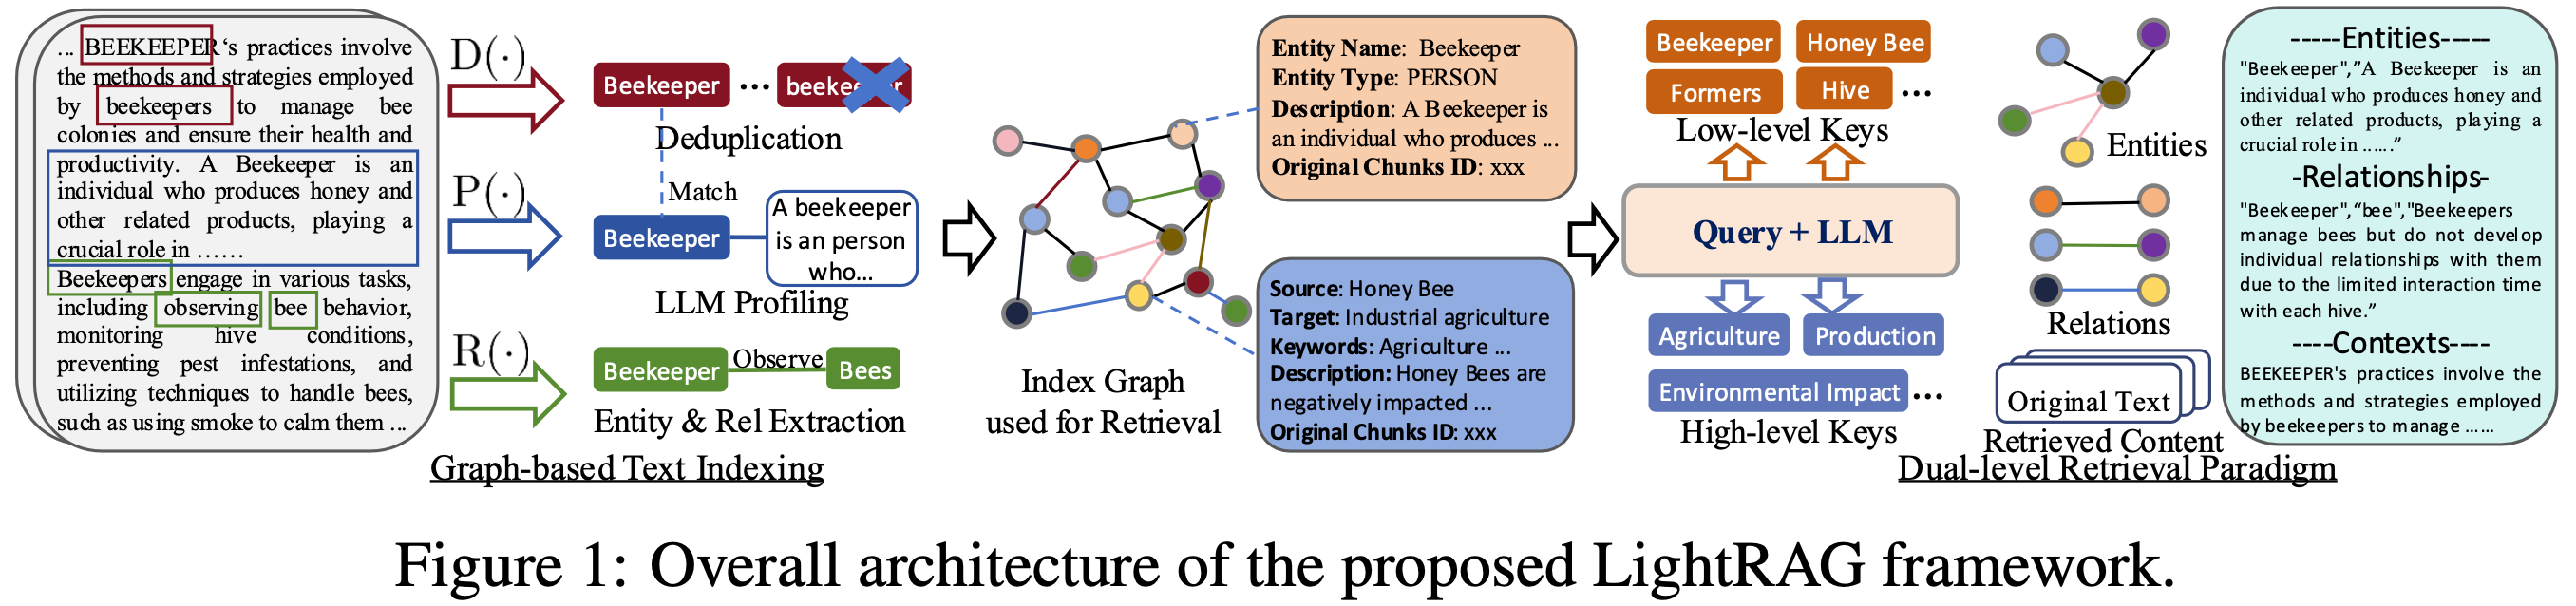
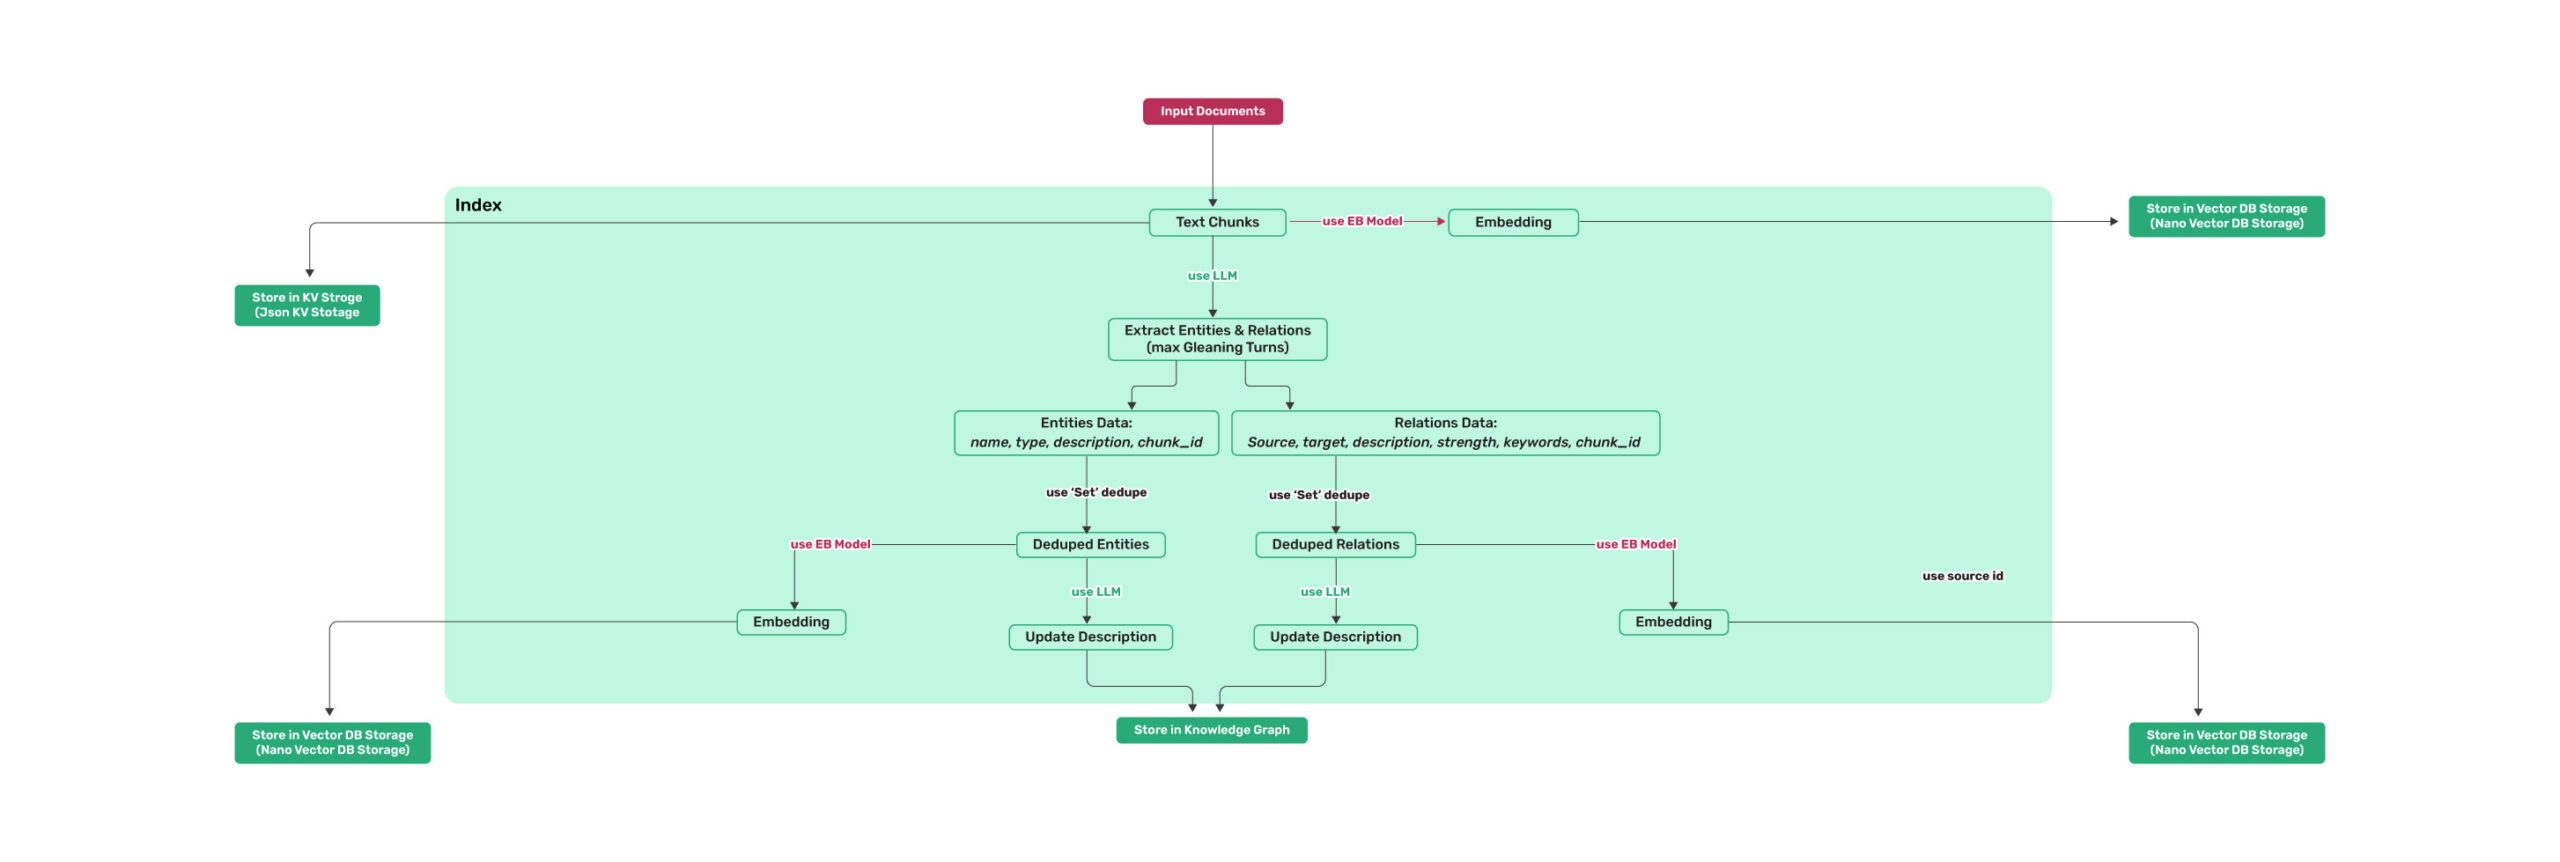
## Algorithm Flowchart
|
||
|
||
|
||
*Figure 1: LightRAG Indexing Flowchart - Img Caption : [Source](https://learnopencv.com/lightrag/)*
|
||
|
||
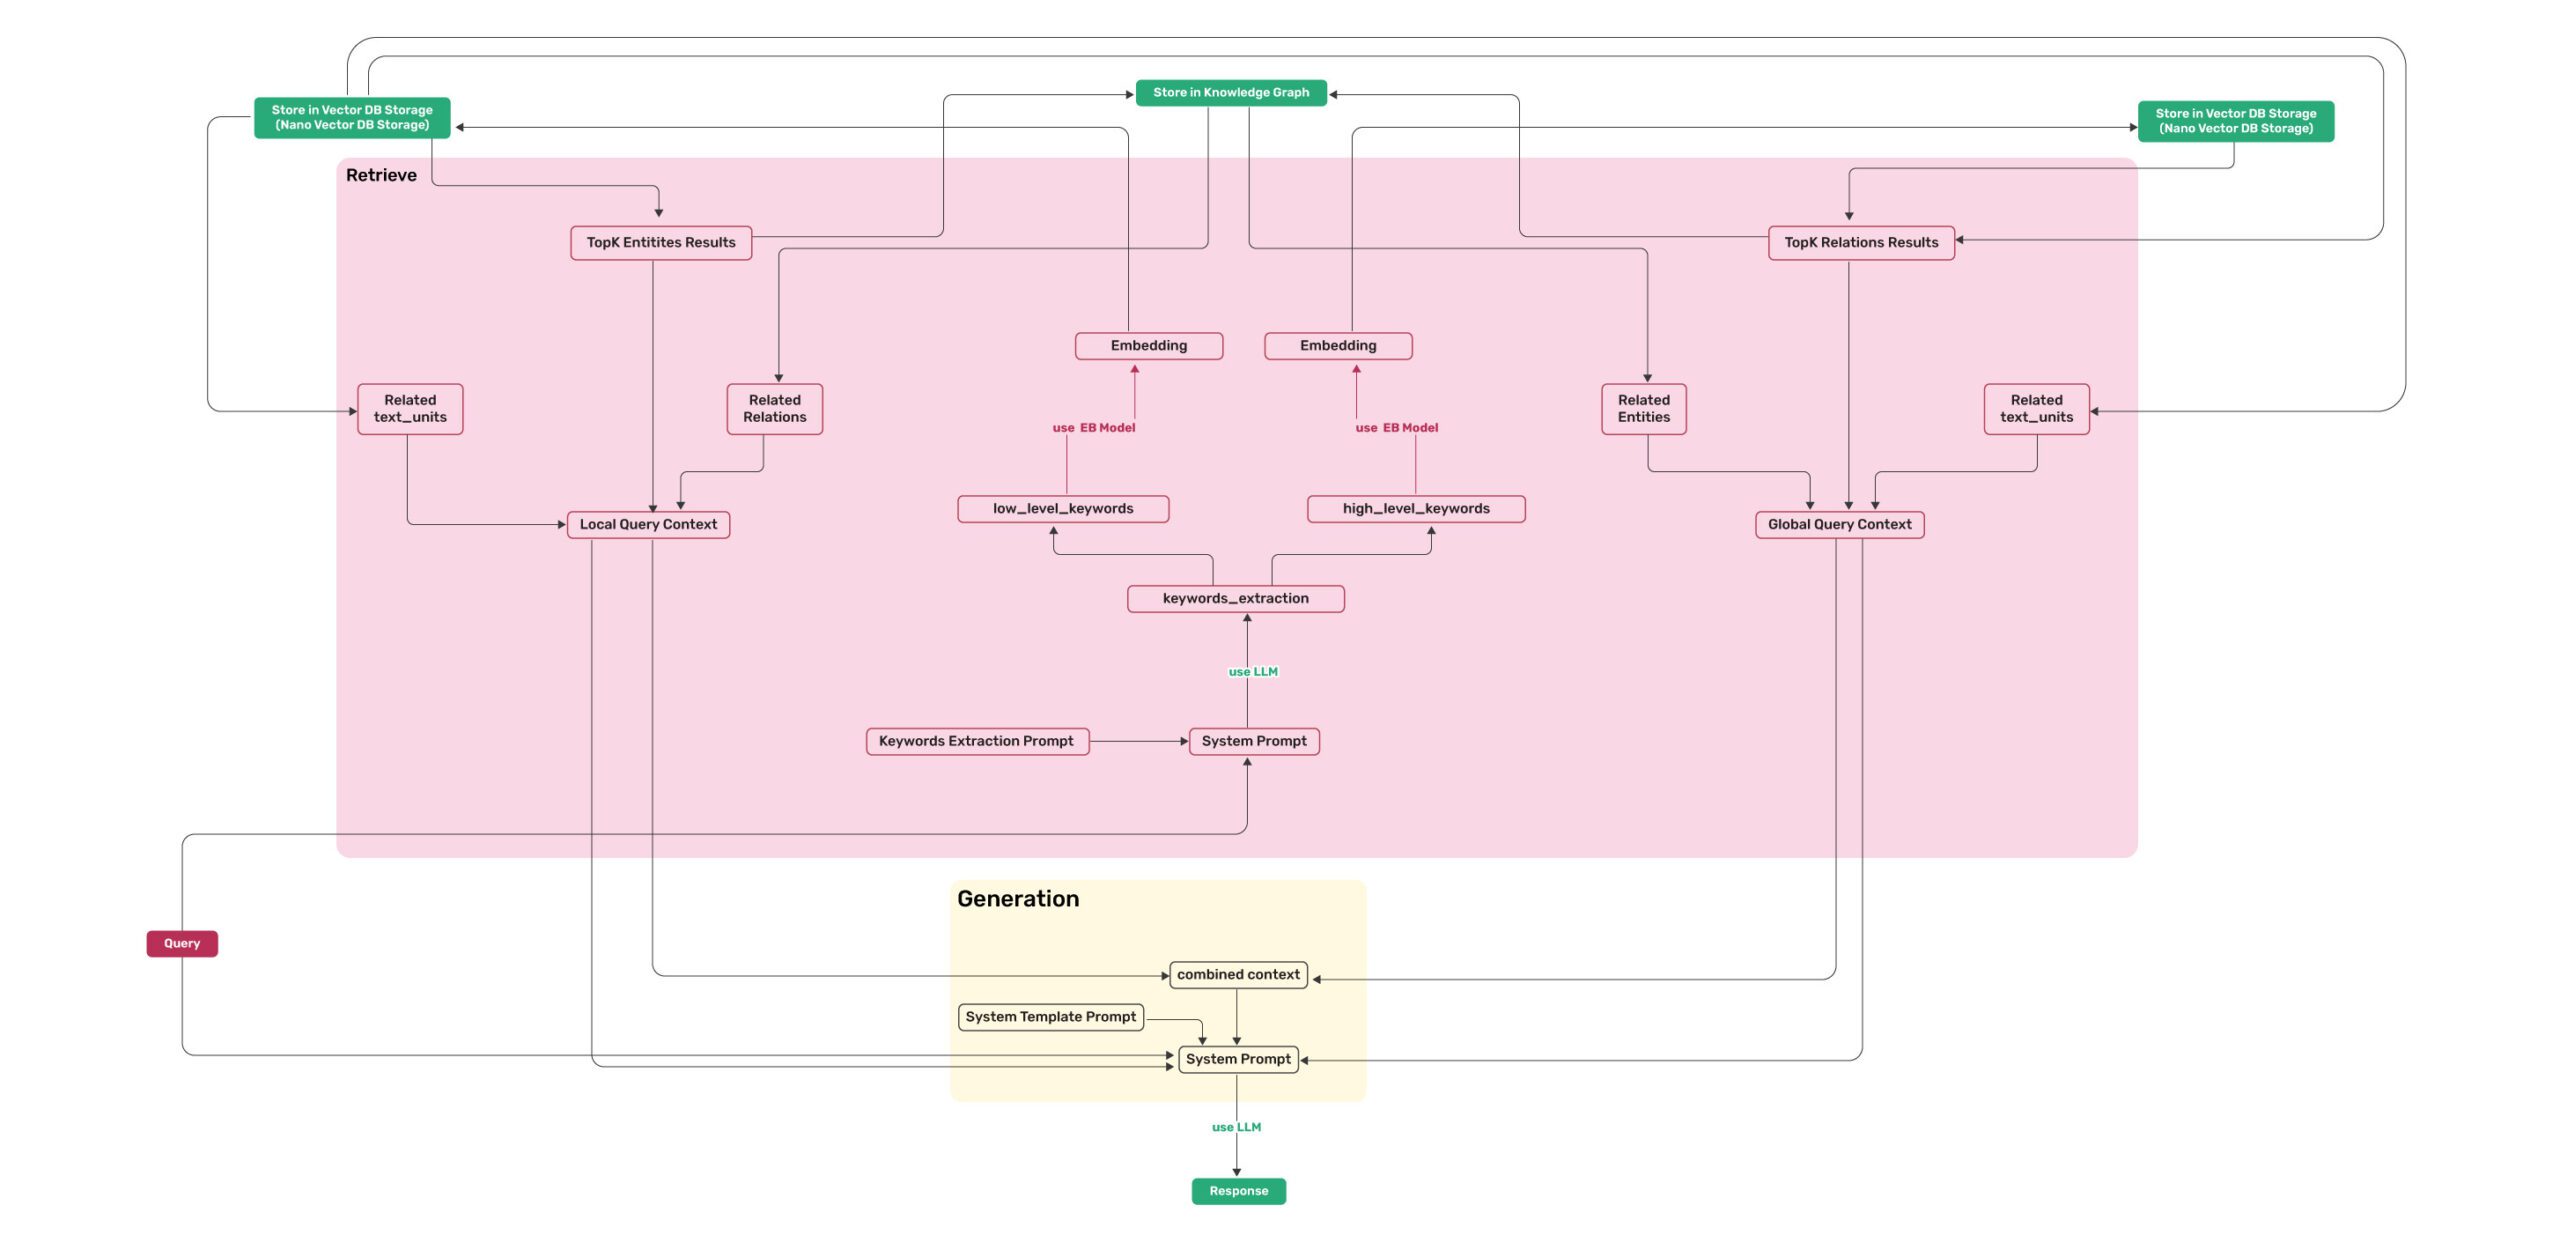
*Figure 2: LightRAG Retrieval and Querying Flowchart - Img Caption : [Source](https://learnopencv.com/lightrag/)*
|
||
|
||
## Install
|
||
|
||
* Install from source (Recommend)
|
||
|
||
```bash
|
||
cd LightRAG
|
||
pip install -e .
|
||
```
|
||
* Install from PyPI
|
||
```bash
|
||
pip install lightrag-hku
|
||
```
|
||
|
||
## Quick Start
|
||
* [Video demo](https://www.youtube.com/watch?v=g21royNJ4fw) of running LightRAG locally.
|
||
* All the code can be found in the `examples`.
|
||
* Set OpenAI API key in environment if using OpenAI models: `export OPENAI_API_KEY="sk-...".`
|
||
* Download the demo text "A Christmas Carol by Charles Dickens":
|
||
```bash
|
||
curl https://raw.githubusercontent.com/gusye1234/nano-graphrag/main/tests/mock_data.txt > ./book.txt
|
||
```
|
||
Use the below Python snippet (in a script) to initialize LightRAG and perform queries:
|
||
|
||
```python
|
||
import os
|
||
from lightrag import LightRAG, QueryParam
|
||
from lightrag.llm import gpt_4o_mini_complete, gpt_4o_complete
|
||
|
||
#########
|
||
# Uncomment the below two lines if running in a jupyter notebook to handle the async nature of rag.insert()
|
||
# import nest_asyncio
|
||
# nest_asyncio.apply()
|
||
#########
|
||
|
||
WORKING_DIR = "./dickens"
|
||
|
||
|
||
if not os.path.exists(WORKING_DIR):
|
||
os.mkdir(WORKING_DIR)
|
||
|
||
rag = LightRAG(
|
||
working_dir=WORKING_DIR,
|
||
llm_model_func=gpt_4o_mini_complete # Use gpt_4o_mini_complete LLM model
|
||
# llm_model_func=gpt_4o_complete # Optionally, use a stronger model
|
||
)
|
||
|
||
with open("./book.txt") as f:
|
||
rag.insert(f.read())
|
||
|
||
# Perform naive search
|
||
print(rag.query("What are the top themes in this story?", param=QueryParam(mode="naive")))
|
||
|
||
# Perform local search
|
||
print(rag.query("What are the top themes in this story?", param=QueryParam(mode="local")))
|
||
|
||
# Perform global search
|
||
print(rag.query("What are the top themes in this story?", param=QueryParam(mode="global")))
|
||
|
||
# Perform hybrid search
|
||
print(rag.query("What are the top themes in this story?", param=QueryParam(mode="hybrid")))
|
||
|
||
# Perform mix search (Knowledge Graph + Vector Retrieval)
|
||
# Mix mode combines knowledge graph and vector search:
|
||
# - Uses both structured (KG) and unstructured (vector) information
|
||
# - Provides comprehensive answers by analyzing relationships and context
|
||
# - Supports image content through HTML img tags
|
||
# - Allows control over retrieval depth via top_k parameter
|
||
print(rag.query("What are the top themes in this story?", param=QueryParam(
|
||
mode="mix")))
|
||
|
||
```
|
||
|
||
|
||
|
||
|
||
<details>
|
||
<summary> Using Open AI-like APIs </summary>
|
||
|
||
* LightRAG also supports Open AI-like chat/embeddings APIs:
|
||
```python
|
||
async def llm_model_func(
|
||
prompt, system_prompt=None, history_messages=[], keyword_extraction=False, **kwargs
|
||
) -> str:
|
||
return await openai_complete_if_cache(
|
||
"solar-mini",
|
||
prompt,
|
||
system_prompt=system_prompt,
|
||
history_messages=history_messages,
|
||
api_key=os.getenv("UPSTAGE_API_KEY"),
|
||
base_url="https://api.upstage.ai/v1/solar",
|
||
**kwargs
|
||
)
|
||
|
||
async def embedding_func(texts: list[str]) -> np.ndarray:
|
||
return await openai_embedding(
|
||
texts,
|
||
model="solar-embedding-1-large-query",
|
||
api_key=os.getenv("UPSTAGE_API_KEY"),
|
||
base_url="https://api.upstage.ai/v1/solar"
|
||
)
|
||
|
||
rag = LightRAG(
|
||
working_dir=WORKING_DIR,
|
||
llm_model_func=llm_model_func,
|
||
embedding_func=EmbeddingFunc(
|
||
embedding_dim=4096,
|
||
max_token_size=8192,
|
||
func=embedding_func
|
||
)
|
||
)
|
||
```
|
||
</details>
|
||
|
||
<details>
|
||
<summary> Using Hugging Face Models </summary>
|
||
|
||
* If you want to use Hugging Face models, you only need to set LightRAG as follows:
|
||
```python
|
||
from lightrag.llm import hf_model_complete, hf_embedding
|
||
from transformers import AutoModel, AutoTokenizer
|
||
from lightrag.utils import EmbeddingFunc
|
||
|
||
# Initialize LightRAG with Hugging Face model
|
||
rag = LightRAG(
|
||
working_dir=WORKING_DIR,
|
||
llm_model_func=hf_model_complete, # Use Hugging Face model for text generation
|
||
llm_model_name='meta-llama/Llama-3.1-8B-Instruct', # Model name from Hugging Face
|
||
# Use Hugging Face embedding function
|
||
embedding_func=EmbeddingFunc(
|
||
embedding_dim=384,
|
||
max_token_size=5000,
|
||
func=lambda texts: hf_embedding(
|
||
texts,
|
||
tokenizer=AutoTokenizer.from_pretrained("sentence-transformers/all-MiniLM-L6-v2"),
|
||
embed_model=AutoModel.from_pretrained("sentence-transformers/all-MiniLM-L6-v2")
|
||
)
|
||
),
|
||
)
|
||
```
|
||
</details>
|
||
|
||
<details>
|
||
<summary> Using Ollama Models </summary>
|
||
|
||
### Overview
|
||
If you want to use Ollama models, you need to pull model you plan to use and embedding model, for example `nomic-embed-text`.
|
||
|
||
Then you only need to set LightRAG as follows:
|
||
|
||
```python
|
||
from lightrag.llm import ollama_model_complete, ollama_embedding
|
||
from lightrag.utils import EmbeddingFunc
|
||
|
||
# Initialize LightRAG with Ollama model
|
||
rag = LightRAG(
|
||
working_dir=WORKING_DIR,
|
||
llm_model_func=ollama_model_complete, # Use Ollama model for text generation
|
||
llm_model_name='your_model_name', # Your model name
|
||
# Use Ollama embedding function
|
||
embedding_func=EmbeddingFunc(
|
||
embedding_dim=768,
|
||
max_token_size=8192,
|
||
func=lambda texts: ollama_embedding(
|
||
texts,
|
||
embed_model="nomic-embed-text"
|
||
)
|
||
),
|
||
)
|
||
```
|
||
|
||
### Increasing context size
|
||
In order for LightRAG to work context should be at least 32k tokens. By default Ollama models have context size of 8k. You can achieve this using one of two ways:
|
||
|
||
#### Increasing the `num_ctx` parameter in Modelfile.
|
||
|
||
1. Pull the model:
|
||
```bash
|
||
ollama pull qwen2
|
||
```
|
||
|
||
2. Display the model file:
|
||
```bash
|
||
ollama show --modelfile qwen2 > Modelfile
|
||
```
|
||
|
||
3. Edit the Modelfile by adding the following line:
|
||
```bash
|
||
PARAMETER num_ctx 32768
|
||
```
|
||
|
||
4. Create the modified model:
|
||
```bash
|
||
ollama create -f Modelfile qwen2m
|
||
```
|
||
|
||
#### Setup `num_ctx` via Ollama API.
|
||
Tiy can use `llm_model_kwargs` param to configure ollama:
|
||
|
||
```python
|
||
rag = LightRAG(
|
||
working_dir=WORKING_DIR,
|
||
llm_model_func=ollama_model_complete, # Use Ollama model for text generation
|
||
llm_model_name='your_model_name', # Your model name
|
||
llm_model_kwargs={"options": {"num_ctx": 32768}},
|
||
# Use Ollama embedding function
|
||
embedding_func=EmbeddingFunc(
|
||
embedding_dim=768,
|
||
max_token_size=8192,
|
||
func=lambda texts: ollama_embedding(
|
||
texts,
|
||
embed_model="nomic-embed-text"
|
||
)
|
||
),
|
||
)
|
||
```
|
||
#### Fully functional example
|
||
|
||
There fully functional example `examples/lightrag_ollama_demo.py` that utilizes `gemma2:2b` model, runs only 4 requests in parallel and set context size to 32k.
|
||
|
||
#### Low RAM GPUs
|
||
|
||
In order to run this experiment on low RAM GPU you should select small model and tune context window (increasing context increase memory consumption). For example, running this ollama example on repurposed mining GPU with 6Gb of RAM required to set context size to 26k while using `gemma2:2b`. It was able to find 197 entities and 19 relations on `book.txt`.
|
||
|
||
</details>
|
||
|
||
### Query Param
|
||
|
||
```python
|
||
class QueryParam:
|
||
mode: Literal["local", "global", "hybrid", "naive", "mix"] = "global"
|
||
only_need_context: bool = False
|
||
response_type: str = "Multiple Paragraphs"
|
||
# Number of top-k items to retrieve; corresponds to entities in "local" mode and relationships in "global" mode.
|
||
top_k: int = 60
|
||
# Number of tokens for the original chunks.
|
||
max_token_for_text_unit: int = 4000
|
||
# Number of tokens for the relationship descriptions
|
||
max_token_for_global_context: int = 4000
|
||
# Number of tokens for the entity descriptions
|
||
max_token_for_local_context: int = 4000
|
||
```
|
||
|
||
### Batch Insert
|
||
|
||
```python
|
||
# Basic Batch Insert: Insert multiple texts at once
|
||
rag.insert(["TEXT1", "TEXT2",...])
|
||
|
||
# Batch Insert with custom batch size configuration
|
||
rag = LightRAG(
|
||
working_dir=WORKING_DIR,
|
||
addon_params={
|
||
"insert_batch_size": 20 # Process 20 documents per batch
|
||
}
|
||
)
|
||
rag.insert(["TEXT1", "TEXT2", "TEXT3", ...]) # Documents will be processed in batches of 20
|
||
```
|
||
|
||
The `insert_batch_size` parameter in `addon_params` controls how many documents are processed in each batch during insertion. This is useful for:
|
||
- Managing memory usage with large document collections
|
||
- Optimizing processing speed
|
||
- Providing better progress tracking
|
||
- Default value is 10 if not specified
|
||
|
||
### Incremental Insert
|
||
|
||
```python
|
||
# Incremental Insert: Insert new documents into an existing LightRAG instance
|
||
rag = LightRAG(
|
||
working_dir=WORKING_DIR,
|
||
llm_model_func=llm_model_func,
|
||
embedding_func=EmbeddingFunc(
|
||
embedding_dim=embedding_dimension,
|
||
max_token_size=8192,
|
||
func=embedding_func,
|
||
),
|
||
)
|
||
|
||
with open("./newText.txt") as f:
|
||
rag.insert(f.read())
|
||
```
|
||
|
||
### Using Neo4J for Storage
|
||
|
||
* For production level scenarios you will most likely want to leverage an enterprise solution
|
||
* for KG storage. Running Neo4J in Docker is recommended for seamless local testing.
|
||
* See: https://hub.docker.com/_/neo4j
|
||
|
||
```python
|
||
export NEO4J_URI="neo4j://localhost:7687"
|
||
export NEO4J_USERNAME="neo4j"
|
||
export NEO4J_PASSWORD="password"
|
||
|
||
# When you launch the project be sure to override the default KG: NetworkX
|
||
# by specifying kg="Neo4JStorage".
|
||
|
||
# Note: Default settings use NetworkX
|
||
# Initialize LightRAG with Neo4J implementation.
|
||
WORKING_DIR = "./local_neo4jWorkDir"
|
||
|
||
rag = LightRAG(
|
||
working_dir=WORKING_DIR,
|
||
llm_model_func=gpt_4o_mini_complete, # Use gpt_4o_mini_complete LLM model
|
||
graph_storage="Neo4JStorage", #<-----------override KG default
|
||
log_level="DEBUG" #<-----------override log_level default
|
||
)
|
||
```
|
||
see test_neo4j.py for a working example.
|
||
|
||
### Insert Custom KG
|
||
|
||
```python
|
||
rag = LightRAG(
|
||
working_dir=WORKING_DIR,
|
||
llm_model_func=llm_model_func,
|
||
embedding_func=EmbeddingFunc(
|
||
embedding_dim=embedding_dimension,
|
||
max_token_size=8192,
|
||
func=embedding_func,
|
||
),
|
||
)
|
||
|
||
custom_kg = {
|
||
"entities": [
|
||
{
|
||
"entity_name": "CompanyA",
|
||
"entity_type": "Organization",
|
||
"description": "A major technology company",
|
||
"source_id": "Source1"
|
||
},
|
||
{
|
||
"entity_name": "ProductX",
|
||
"entity_type": "Product",
|
||
"description": "A popular product developed by CompanyA",
|
||
"source_id": "Source1"
|
||
}
|
||
],
|
||
"relationships": [
|
||
{
|
||
"src_id": "CompanyA",
|
||
"tgt_id": "ProductX",
|
||
"description": "CompanyA develops ProductX",
|
||
"keywords": "develop, produce",
|
||
"weight": 1.0,
|
||
"source_id": "Source1"
|
||
}
|
||
],
|
||
"chunks": [
|
||
{
|
||
"content": "ProductX, developed by CompanyA, has revolutionized the market with its cutting-edge features.",
|
||
"source_id": "Source1",
|
||
},
|
||
{
|
||
"content": "PersonA is a prominent researcher at UniversityB, focusing on artificial intelligence and machine learning.",
|
||
"source_id": "Source2",
|
||
},
|
||
{
|
||
"content": "None",
|
||
"source_id": "UNKNOWN",
|
||
},
|
||
],
|
||
}
|
||
|
||
rag.insert_custom_kg(custom_kg)
|
||
```
|
||
|
||
### Delete Entity
|
||
|
||
```python
|
||
# Delete Entity: Deleting entities by their names
|
||
rag = LightRAG(
|
||
working_dir=WORKING_DIR,
|
||
llm_model_func=llm_model_func,
|
||
embedding_func=EmbeddingFunc(
|
||
embedding_dim=embedding_dimension,
|
||
max_token_size=8192,
|
||
func=embedding_func,
|
||
),
|
||
)
|
||
|
||
rag.delete_by_entity("Project Gutenberg")
|
||
```
|
||
|
||
### Multi-file Type Support
|
||
|
||
The `textract` supports reading file types such as TXT, DOCX, PPTX, CSV, and PDF.
|
||
|
||
```python
|
||
import textract
|
||
|
||
file_path = 'TEXT.pdf'
|
||
text_content = textract.process(file_path)
|
||
|
||
rag.insert(text_content.decode('utf-8'))
|
||
```
|
||
|
||
### Graph Visualization
|
||
|
||
<details>
|
||
<summary> Graph visualization with html </summary>
|
||
|
||
* The following code can be found in `examples/graph_visual_with_html.py`
|
||
|
||
```python
|
||
import networkx as nx
|
||
from pyvis.network import Network
|
||
|
||
# Load the GraphML file
|
||
G = nx.read_graphml('./dickens/graph_chunk_entity_relation.graphml')
|
||
|
||
# Create a Pyvis network
|
||
net = Network(notebook=True)
|
||
|
||
# Convert NetworkX graph to Pyvis network
|
||
net.from_nx(G)
|
||
|
||
# Save and display the network
|
||
net.show('knowledge_graph.html')
|
||
```
|
||
|
||
</details>
|
||
|
||
<details>
|
||
<summary> Graph visualization with Neo4j </summary>
|
||
|
||
* The following code can be found in `examples/graph_visual_with_neo4j.py`
|
||
|
||
```python
|
||
import os
|
||
import json
|
||
from lightrag.utils import xml_to_json
|
||
from neo4j import GraphDatabase
|
||
|
||
# Constants
|
||
WORKING_DIR = "./dickens"
|
||
BATCH_SIZE_NODES = 500
|
||
BATCH_SIZE_EDGES = 100
|
||
|
||
# Neo4j connection credentials
|
||
NEO4J_URI = "bolt://localhost:7687"
|
||
NEO4J_USERNAME = "neo4j"
|
||
NEO4J_PASSWORD = "your_password"
|
||
|
||
def convert_xml_to_json(xml_path, output_path):
|
||
"""Converts XML file to JSON and saves the output."""
|
||
if not os.path.exists(xml_path):
|
||
print(f"Error: File not found - {xml_path}")
|
||
return None
|
||
|
||
json_data = xml_to_json(xml_path)
|
||
if json_data:
|
||
with open(output_path, 'w', encoding='utf-8') as f:
|
||
json.dump(json_data, f, ensure_ascii=False, indent=2)
|
||
print(f"JSON file created: {output_path}")
|
||
return json_data
|
||
else:
|
||
print("Failed to create JSON data")
|
||
return None
|
||
|
||
def process_in_batches(tx, query, data, batch_size):
|
||
"""Process data in batches and execute the given query."""
|
||
for i in range(0, len(data), batch_size):
|
||
batch = data[i:i + batch_size]
|
||
tx.run(query, {"nodes": batch} if "nodes" in query else {"edges": batch})
|
||
|
||
def main():
|
||
# Paths
|
||
xml_file = os.path.join(WORKING_DIR, 'graph_chunk_entity_relation.graphml')
|
||
json_file = os.path.join(WORKING_DIR, 'graph_data.json')
|
||
|
||
# Convert XML to JSON
|
||
json_data = convert_xml_to_json(xml_file, json_file)
|
||
if json_data is None:
|
||
return
|
||
|
||
# Load nodes and edges
|
||
nodes = json_data.get('nodes', [])
|
||
edges = json_data.get('edges', [])
|
||
|
||
# Neo4j queries
|
||
create_nodes_query = """
|
||
UNWIND $nodes AS node
|
||
MERGE (e:Entity {id: node.id})
|
||
SET e.entity_type = node.entity_type,
|
||
e.description = node.description,
|
||
e.source_id = node.source_id,
|
||
e.displayName = node.id
|
||
REMOVE e:Entity
|
||
WITH e, node
|
||
CALL apoc.create.addLabels(e, [node.entity_type]) YIELD node AS labeledNode
|
||
RETURN count(*)
|
||
"""
|
||
|
||
create_edges_query = """
|
||
UNWIND $edges AS edge
|
||
MATCH (source {id: edge.source})
|
||
MATCH (target {id: edge.target})
|
||
WITH source, target, edge,
|
||
CASE
|
||
WHEN edge.keywords CONTAINS 'lead' THEN 'lead'
|
||
WHEN edge.keywords CONTAINS 'participate' THEN 'participate'
|
||
WHEN edge.keywords CONTAINS 'uses' THEN 'uses'
|
||
WHEN edge.keywords CONTAINS 'located' THEN 'located'
|
||
WHEN edge.keywords CONTAINS 'occurs' THEN 'occurs'
|
||
ELSE REPLACE(SPLIT(edge.keywords, ',')[0], '\"', '')
|
||
END AS relType
|
||
CALL apoc.create.relationship(source, relType, {
|
||
weight: edge.weight,
|
||
description: edge.description,
|
||
keywords: edge.keywords,
|
||
source_id: edge.source_id
|
||
}, target) YIELD rel
|
||
RETURN count(*)
|
||
"""
|
||
|
||
set_displayname_and_labels_query = """
|
||
MATCH (n)
|
||
SET n.displayName = n.id
|
||
WITH n
|
||
CALL apoc.create.setLabels(n, [n.entity_type]) YIELD node
|
||
RETURN count(*)
|
||
"""
|
||
|
||
# Create a Neo4j driver
|
||
driver = GraphDatabase.driver(NEO4J_URI, auth=(NEO4J_USERNAME, NEO4J_PASSWORD))
|
||
|
||
try:
|
||
# Execute queries in batches
|
||
with driver.session() as session:
|
||
# Insert nodes in batches
|
||
session.execute_write(process_in_batches, create_nodes_query, nodes, BATCH_SIZE_NODES)
|
||
|
||
# Insert edges in batches
|
||
session.execute_write(process_in_batches, create_edges_query, edges, BATCH_SIZE_EDGES)
|
||
|
||
# Set displayName and labels
|
||
session.run(set_displayname_and_labels_query)
|
||
|
||
except Exception as e:
|
||
print(f"Error occurred: {e}")
|
||
|
||
finally:
|
||
driver.close()
|
||
|
||
if __name__ == "__main__":
|
||
main()
|
||
```
|
||
|
||
</details>
|
||
|
||
### LightRAG init parameters
|
||
|
||
| **Parameter** | **Type** | **Explanation** | **Default** |
|
||
| --- | --- | --- | --- |
|
||
| **working\_dir** | `str` | Directory where the cache will be stored | `lightrag_cache+timestamp` |
|
||
| **kv\_storage** | `str` | Storage type for documents and text chunks. Supported types: `JsonKVStorage`, `OracleKVStorage` | `JsonKVStorage` |
|
||
| **vector\_storage** | `str` | Storage type for embedding vectors. Supported types: `NanoVectorDBStorage`, `OracleVectorDBStorage` | `NanoVectorDBStorage` |
|
||
| **graph\_storage** | `str` | Storage type for graph edges and nodes. Supported types: `NetworkXStorage`, `Neo4JStorage`, `OracleGraphStorage` | `NetworkXStorage` |
|
||
| **log\_level** | | Log level for application runtime | `logging.DEBUG` |
|
||
| **chunk\_token\_size** | `int` | Maximum token size per chunk when splitting documents | `1200` |
|
||
| **chunk\_overlap\_token\_size** | `int` | Overlap token size between two chunks when splitting documents | `100` |
|
||
| **tiktoken\_model\_name** | `str` | Model name for the Tiktoken encoder used to calculate token numbers | `gpt-4o-mini` |
|
||
| **entity\_extract\_max\_gleaning** | `int` | Number of loops in the entity extraction process, appending history messages | `1` |
|
||
| **entity\_summary\_to\_max\_tokens** | `int` | Maximum token size for each entity summary | `500` |
|
||
| **node\_embedding\_algorithm** | `str` | Algorithm for node embedding (currently not used) | `node2vec` |
|
||
| **node2vec\_params** | `dict` | Parameters for node embedding | `{"dimensions": 1536,"num_walks": 10,"walk_length": 40,"window_size": 2,"iterations": 3,"random_seed": 3,}` |
|
||
| **embedding\_func** | `EmbeddingFunc` | Function to generate embedding vectors from text | `openai_embedding` |
|
||
| **embedding\_batch\_num** | `int` | Maximum batch size for embedding processes (multiple texts sent per batch) | `32` |
|
||
| **embedding\_func\_max\_async** | `int` | Maximum number of concurrent asynchronous embedding processes | `16` |
|
||
| **llm\_model\_func** | `callable` | Function for LLM generation | `gpt_4o_mini_complete` |
|
||
| **llm\_model\_name** | `str` | LLM model name for generation | `meta-llama/Llama-3.2-1B-Instruct` |
|
||
| **llm\_model\_max\_token\_size** | `int` | Maximum token size for LLM generation (affects entity relation summaries) | `32768` |
|
||
| **llm\_model\_max\_async** | `int` | Maximum number of concurrent asynchronous LLM processes | `16` |
|
||
| **llm\_model\_kwargs** | `dict` | Additional parameters for LLM generation | |
|
||
| **vector\_db\_storage\_cls\_kwargs** | `dict` | Additional parameters for vector database (currently not used) | |
|
||
| **enable\_llm\_cache** | `bool` | If `TRUE`, stores LLM results in cache; repeated prompts return cached responses | `TRUE` |
|
||
| **addon\_params** | `dict` | Additional parameters, e.g., `{"example_number": 1, "language": "Simplified Chinese", "entity_types": ["organization", "person", "geo", "event"], "insert_batch_size": 10}`: sets example limit, output language, and batch size for document processing | `example_number: all examples, language: English, insert_batch_size: 10` |
|
||
| **convert\_response\_to\_json\_func** | `callable` | Not used | `convert_response_to_json` |
|
||
| **embedding\_cache\_config** | `dict` | Configuration for question-answer caching. Contains three parameters:<br>- `enabled`: Boolean value to enable/disable cache lookup functionality. When enabled, the system will check cached responses before generating new answers.<br>- `similarity_threshold`: Float value (0-1), similarity threshold. When a new question's similarity with a cached question exceeds this threshold, the cached answer will be returned directly without calling the LLM.<br>- `use_llm_check`: Boolean value to enable/disable LLM similarity verification. When enabled, LLM will be used as a secondary check to verify the similarity between questions before returning cached answers. | Default: `{"enabled": False, "similarity_threshold": 0.95, "use_llm_check": False}` |
|
||
|
||
### Error Handling
|
||
<details>
|
||
<summary>Click to view error handling details</summary>
|
||
|
||
The API includes comprehensive error handling:
|
||
- File not found errors (404)
|
||
- Processing errors (500)
|
||
- Supports multiple file encodings (UTF-8 and GBK)
|
||
</details>
|
||
|
||
## Evaluation
|
||
### Dataset
|
||
The dataset used in LightRAG can be downloaded from [TommyChien/UltraDomain](https://huggingface.co/datasets/TommyChien/UltraDomain).
|
||
|
||
### Generate Query
|
||
LightRAG uses the following prompt to generate high-level queries, with the corresponding code in `example/generate_query.py`.
|
||
|
||
<details>
|
||
<summary> Prompt </summary>
|
||
|
||
```python
|
||
Given the following description of a dataset:
|
||
|
||
{description}
|
||
|
||
Please identify 5 potential users who would engage with this dataset. For each user, list 5 tasks they would perform with this dataset. Then, for each (user, task) combination, generate 5 questions that require a high-level understanding of the entire dataset.
|
||
|
||
Output the results in the following structure:
|
||
- User 1: [user description]
|
||
- Task 1: [task description]
|
||
- Question 1:
|
||
- Question 2:
|
||
- Question 3:
|
||
- Question 4:
|
||
- Question 5:
|
||
- Task 2: [task description]
|
||
...
|
||
- Task 5: [task description]
|
||
- User 2: [user description]
|
||
...
|
||
- User 5: [user description]
|
||
...
|
||
```
|
||
</details>
|
||
|
||
### Batch Eval
|
||
To evaluate the performance of two RAG systems on high-level queries, LightRAG uses the following prompt, with the specific code available in `example/batch_eval.py`.
|
||
|
||
<details>
|
||
<summary> Prompt </summary>
|
||
|
||
```python
|
||
---Role---
|
||
You are an expert tasked with evaluating two answers to the same question based on three criteria: **Comprehensiveness**, **Diversity**, and **Empowerment**.
|
||
---Goal---
|
||
You will evaluate two answers to the same question based on three criteria: **Comprehensiveness**, **Diversity**, and **Empowerment**.
|
||
|
||
- **Comprehensiveness**: How much detail does the answer provide to cover all aspects and details of the question?
|
||
- **Diversity**: How varied and rich is the answer in providing different perspectives and insights on the question?
|
||
- **Empowerment**: How well does the answer help the reader understand and make informed judgments about the topic?
|
||
|
||
For each criterion, choose the better answer (either Answer 1 or Answer 2) and explain why. Then, select an overall winner based on these three categories.
|
||
|
||
Here is the question:
|
||
{query}
|
||
|
||
Here are the two answers:
|
||
|
||
**Answer 1:**
|
||
{answer1}
|
||
|
||
**Answer 2:**
|
||
{answer2}
|
||
|
||
Evaluate both answers using the three criteria listed above and provide detailed explanations for each criterion.
|
||
|
||
Output your evaluation in the following JSON format:
|
||
|
||
{{
|
||
"Comprehensiveness": {{
|
||
"Winner": "[Answer 1 or Answer 2]",
|
||
"Explanation": "[Provide explanation here]"
|
||
}},
|
||
"Empowerment": {{
|
||
"Winner": "[Answer 1 or Answer 2]",
|
||
"Explanation": "[Provide explanation here]"
|
||
}},
|
||
"Overall Winner": {{
|
||
"Winner": "[Answer 1 or Answer 2]",
|
||
"Explanation": "[Summarize why this answer is the overall winner based on the three criteria]"
|
||
}}
|
||
}}
|
||
```
|
||
</details>
|
||
|
||
### Overall Performance Table
|
||
| | **Agriculture** | | **CS** | | **Legal** | | **Mix** | |
|
||
|----------------------|-------------------------|-----------------------|-----------------------|-----------------------|-----------------------|-----------------------|-----------------------|-----------------------|
|
||
| | NaiveRAG | **LightRAG** | NaiveRAG | **LightRAG** | NaiveRAG | **LightRAG** | NaiveRAG | **LightRAG** |
|
||
| **Comprehensiveness** | 32.4% | **67.6%** | 38.4% | **61.6%** | 16.4% | **83.6%** | 38.8% | **61.2%** |
|
||
| **Diversity** | 23.6% | **76.4%** | 38.0% | **62.0%** | 13.6% | **86.4%** | 32.4% | **67.6%** |
|
||
| **Empowerment** | 32.4% | **67.6%** | 38.8% | **61.2%** | 16.4% | **83.6%** | 42.8% | **57.2%** |
|
||
| **Overall** | 32.4% | **67.6%** | 38.8% | **61.2%** | 15.2% | **84.8%** | 40.0% | **60.0%** |
|
||
| | RQ-RAG | **LightRAG** | RQ-RAG | **LightRAG** | RQ-RAG | **LightRAG** | RQ-RAG | **LightRAG** |
|
||
| **Comprehensiveness** | 31.6% | **68.4%** | 38.8% | **61.2%** | 15.2% | **84.8%** | 39.2% | **60.8%** |
|
||
| **Diversity** | 29.2% | **70.8%** | 39.2% | **60.8%** | 11.6% | **88.4%** | 30.8% | **69.2%** |
|
||
| **Empowerment** | 31.6% | **68.4%** | 36.4% | **63.6%** | 15.2% | **84.8%** | 42.4% | **57.6%** |
|
||
| **Overall** | 32.4% | **67.6%** | 38.0% | **62.0%** | 14.4% | **85.6%** | 40.0% | **60.0%** |
|
||
| | HyDE | **LightRAG** | HyDE | **LightRAG** | HyDE | **LightRAG** | HyDE | **LightRAG** |
|
||
| **Comprehensiveness** | 26.0% | **74.0%** | 41.6% | **58.4%** | 26.8% | **73.2%** | 40.4% | **59.6%** |
|
||
| **Diversity** | 24.0% | **76.0%** | 38.8% | **61.2%** | 20.0% | **80.0%** | 32.4% | **67.6%** |
|
||
| **Empowerment** | 25.2% | **74.8%** | 40.8% | **59.2%** | 26.0% | **74.0%** | 46.0% | **54.0%** |
|
||
| **Overall** | 24.8% | **75.2%** | 41.6% | **58.4%** | 26.4% | **73.6%** | 42.4% | **57.6%** |
|
||
| | GraphRAG | **LightRAG** | GraphRAG | **LightRAG** | GraphRAG | **LightRAG** | GraphRAG | **LightRAG** |
|
||
| **Comprehensiveness** | 45.6% | **54.4%** | 48.4% | **51.6%** | 48.4% | **51.6%** | **50.4%** | 49.6% |
|
||
| **Diversity** | 22.8% | **77.2%** | 40.8% | **59.2%** | 26.4% | **73.6%** | 36.0% | **64.0%** |
|
||
| **Empowerment** | 41.2% | **58.8%** | 45.2% | **54.8%** | 43.6% | **56.4%** | **50.8%** | 49.2% |
|
||
| **Overall** | 45.2% | **54.8%** | 48.0% | **52.0%** | 47.2% | **52.8%** | **50.4%** | 49.6% |
|
||
|
||
## Reproduce
|
||
All the code can be found in the `./reproduce` directory.
|
||
|
||
### Step-0 Extract Unique Contexts
|
||
First, we need to extract unique contexts in the datasets.
|
||
|
||
<details>
|
||
<summary> Code </summary>
|
||
|
||
```python
|
||
def extract_unique_contexts(input_directory, output_directory):
|
||
|
||
os.makedirs(output_directory, exist_ok=True)
|
||
|
||
jsonl_files = glob.glob(os.path.join(input_directory, '*.jsonl'))
|
||
print(f"Found {len(jsonl_files)} JSONL files.")
|
||
|
||
for file_path in jsonl_files:
|
||
filename = os.path.basename(file_path)
|
||
name, ext = os.path.splitext(filename)
|
||
output_filename = f"{name}_unique_contexts.json"
|
||
output_path = os.path.join(output_directory, output_filename)
|
||
|
||
unique_contexts_dict = {}
|
||
|
||
print(f"Processing file: {filename}")
|
||
|
||
try:
|
||
with open(file_path, 'r', encoding='utf-8') as infile:
|
||
for line_number, line in enumerate(infile, start=1):
|
||
line = line.strip()
|
||
if not line:
|
||
continue
|
||
try:
|
||
json_obj = json.loads(line)
|
||
context = json_obj.get('context')
|
||
if context and context not in unique_contexts_dict:
|
||
unique_contexts_dict[context] = None
|
||
except json.JSONDecodeError as e:
|
||
print(f"JSON decoding error in file {filename} at line {line_number}: {e}")
|
||
except FileNotFoundError:
|
||
print(f"File not found: {filename}")
|
||
continue
|
||
except Exception as e:
|
||
print(f"An error occurred while processing file {filename}: {e}")
|
||
continue
|
||
|
||
unique_contexts_list = list(unique_contexts_dict.keys())
|
||
print(f"There are {len(unique_contexts_list)} unique `context` entries in the file {filename}.")
|
||
|
||
try:
|
||
with open(output_path, 'w', encoding='utf-8') as outfile:
|
||
json.dump(unique_contexts_list, outfile, ensure_ascii=False, indent=4)
|
||
print(f"Unique `context` entries have been saved to: {output_filename}")
|
||
except Exception as e:
|
||
print(f"An error occurred while saving to the file {output_filename}: {e}")
|
||
|
||
print("All files have been processed.")
|
||
|
||
```
|
||
</details>
|
||
|
||
### Step-1 Insert Contexts
|
||
For the extracted contexts, we insert them into the LightRAG system.
|
||
|
||
<details>
|
||
<summary> Code </summary>
|
||
|
||
```python
|
||
def insert_text(rag, file_path):
|
||
with open(file_path, mode='r') as f:
|
||
unique_contexts = json.load(f)
|
||
|
||
retries = 0
|
||
max_retries = 3
|
||
while retries < max_retries:
|
||
try:
|
||
rag.insert(unique_contexts)
|
||
break
|
||
except Exception as e:
|
||
retries += 1
|
||
print(f"Insertion failed, retrying ({retries}/{max_retries}), error: {e}")
|
||
time.sleep(10)
|
||
if retries == max_retries:
|
||
print("Insertion failed after exceeding the maximum number of retries")
|
||
```
|
||
</details>
|
||
|
||
### Step-2 Generate Queries
|
||
|
||
We extract tokens from the first and the second half of each context in the dataset, then combine them as dataset descriptions to generate queries.
|
||
|
||
<details>
|
||
<summary> Code </summary>
|
||
|
||
```python
|
||
tokenizer = GPT2Tokenizer.from_pretrained('gpt2')
|
||
|
||
def get_summary(context, tot_tokens=2000):
|
||
tokens = tokenizer.tokenize(context)
|
||
half_tokens = tot_tokens // 2
|
||
|
||
start_tokens = tokens[1000:1000 + half_tokens]
|
||
end_tokens = tokens[-(1000 + half_tokens):1000]
|
||
|
||
summary_tokens = start_tokens + end_tokens
|
||
summary = tokenizer.convert_tokens_to_string(summary_tokens)
|
||
|
||
return summary
|
||
```
|
||
</details>
|
||
|
||
### Step-3 Query
|
||
For the queries generated in Step-2, we will extract them and query LightRAG.
|
||
|
||
<details>
|
||
<summary> Code </summary>
|
||
|
||
```python
|
||
def extract_queries(file_path):
|
||
with open(file_path, 'r') as f:
|
||
data = f.read()
|
||
|
||
data = data.replace('**', '')
|
||
|
||
queries = re.findall(r'- Question \d+: (.+)', data)
|
||
|
||
return queries
|
||
```
|
||
</details>
|
||
|
||
## Code Structure
|
||
|
||
```python
|
||
.
|
||
├── .github/
|
||
│ ├── workflows/
|
||
│ │ └── linting.yaml
|
||
├── examples/
|
||
│ ├── batch_eval.py
|
||
│ ├── generate_query.py
|
||
│ ├── graph_visual_with_html.py
|
||
│ ├── graph_visual_with_neo4j.py
|
||
│ ├── insert_custom_kg.py
|
||
│ ├── lightrag_api_openai_compatible_demo.py
|
||
│ ├── lightrag_api_oracle_demo..py
|
||
│ ├── lightrag_azure_openai_demo.py
|
||
│ ├── lightrag_bedrock_demo.py
|
||
│ ├── lightrag_hf_demo.py
|
||
│ ├── lightrag_lmdeploy_demo.py
|
||
│ ├── lightrag_nvidia_demo.py
|
||
│ ├── lightrag_ollama_demo.py
|
||
│ ├── lightrag_openai_compatible_demo.py
|
||
│ ├── lightrag_openai_demo.py
|
||
│ ├── lightrag_oracle_demo.py
|
||
│ ├── lightrag_siliconcloud_demo.py
|
||
│ └── vram_management_demo.py
|
||
├── lightrag/
|
||
│ ├── api/
|
||
│ │ ├── lollms_lightrag_server.py
|
||
│ │ ├── ollama_lightrag_server.py
|
||
│ │ ├── openai_lightrag_server.py
|
||
│ │ ├── azure_openai_lightrag_server.py
|
||
│ │ └── requirements.txt
|
||
│ ├── kg/
|
||
│ │ ├── __init__.py
|
||
│ │ ├── oracle_impl.py
|
||
│ │ └── neo4j_impl.py
|
||
│ ├── __init__.py
|
||
│ ├── base.py
|
||
│ ├── lightrag.py
|
||
│ ├── llm.py
|
||
│ ├── operate.py
|
||
│ ├── prompt.py
|
||
│ ├── storage.py
|
||
│ └── utils.py
|
||
├── reproduce/
|
||
│ ├── Step_0.py
|
||
│ ├── Step_1_openai_compatible.py
|
||
│ ├── Step_1.py
|
||
│ ├── Step_2.py
|
||
│ ├── Step_3_openai_compatible.py
|
||
│ └── Step_3.py
|
||
├── .gitignore
|
||
├── .pre-commit-config.yaml
|
||
├── get_all_edges_nx.py
|
||
├── LICENSE
|
||
├── README.md
|
||
├── requirements.txt
|
||
├── setup.py
|
||
├── test_neo4j.py
|
||
└── test.py
|
||
```
|
||
|
||
## Install with API Support
|
||
|
||
LightRAG provides optional API support through FastAPI servers that add RAG capabilities to existing LLM services. You can install LightRAG with API support in two ways:
|
||
|
||
### 1. Installation from PyPI
|
||
|
||
```bash
|
||
pip install "lightrag-hku[api]"
|
||
```
|
||
|
||
### 2. Installation from Source (Development)
|
||
|
||
```bash
|
||
# Clone the repository
|
||
git clone https://github.com/HKUDS/lightrag.git
|
||
|
||
# Change to the repository directory
|
||
cd lightrag
|
||
|
||
# Install in editable mode with API support
|
||
pip install -e ".[api]"
|
||
```
|
||
|
||
### Prerequisites
|
||
|
||
Before running any of the servers, ensure you have the corresponding backend service running:
|
||
|
||
#### For LoLLMs Server
|
||
- LoLLMs must be running and accessible
|
||
- Default connection: http://localhost:9600
|
||
- Configure using --lollms-host if running on a different host/port
|
||
|
||
#### For Ollama Server
|
||
- Ollama must be running and accessible
|
||
- Default connection: http://localhost:11434
|
||
- Configure using --ollama-host if running on a different host/port
|
||
|
||
#### For OpenAI Server
|
||
- Requires valid OpenAI API credentials set in environment variables
|
||
- OPENAI_API_KEY must be set
|
||
|
||
#### For Azure OpenAI Server
|
||
Azure OpenAI API can be created using the following commands in Azure CLI (you need to install Azure CLI first from [https://docs.microsoft.com/en-us/cli/azure/install-azure-cli](https://docs.microsoft.com/en-us/cli/azure/install-azure-cli)):
|
||
```bash
|
||
# Change the resource group name, location and OpenAI resource name as needed
|
||
RESOURCE_GROUP_NAME=LightRAG
|
||
LOCATION=swedencentral
|
||
RESOURCE_NAME=LightRAG-OpenAI
|
||
|
||
az login
|
||
az group create --name $RESOURCE_GROUP_NAME --location $LOCATION
|
||
az cognitiveservices account create --name $RESOURCE_NAME --resource-group $RESOURCE_GROUP_NAME --kind OpenAI --sku S0 --location swedencentral
|
||
az cognitiveservices account deployment create --resource-group $RESOURCE_GROUP_NAME --model-format OpenAI --name $RESOURCE_NAME --deployment-name gpt-4o --model-name gpt-4o --model-version "2024-08-06" --sku-capacity 100 --sku-name "Standard"
|
||
az cognitiveservices account deployment create --resource-group $RESOURCE_GROUP_NAME --model-format OpenAI --name $RESOURCE_NAME --deployment-name text-embedding-3-large --model-name text-embedding-3-large --model-version "1" --sku-capacity 80 --sku-name "Standard"
|
||
az cognitiveservices account show --name $RESOURCE_NAME --resource-group $RESOURCE_GROUP_NAME --query "properties.endpoint"
|
||
az cognitiveservices account keys list --name $RESOURCE_NAME -g $RESOURCE_GROUP_NAME
|
||
|
||
```
|
||
The output of the last command will give you the endpoint and the key for the OpenAI API. You can use these values to set the environment variables in the `.env` file.
|
||
|
||
|
||
|
||
### Configuration Options
|
||
|
||
Each server has its own specific configuration options:
|
||
|
||
#### LoLLMs Server Options
|
||
|
||
| Parameter | Default | Description |
|
||
|-----------|---------|-------------|
|
||
| --host | 0.0.0.0 | RAG server host |
|
||
| --port | 9621 | RAG server port |
|
||
| --model | mistral-nemo:latest | LLM model name |
|
||
| --embedding-model | bge-m3:latest | Embedding model name |
|
||
| --lollms-host | http://localhost:9600 | LoLLMS backend URL |
|
||
| --working-dir | ./rag_storage | Working directory for RAG |
|
||
| --max-async | 4 | Maximum async operations |
|
||
| --max-tokens | 32768 | Maximum token size |
|
||
| --embedding-dim | 1024 | Embedding dimensions |
|
||
| --max-embed-tokens | 8192 | Maximum embedding token size |
|
||
| --input-file | ./book.txt | Initial input file |
|
||
| --log-level | INFO | Logging level |
|
||
|
||
#### Ollama Server Options
|
||
|
||
| Parameter | Default | Description |
|
||
|-----------|---------|-------------|
|
||
| --host | 0.0.0.0 | RAG server host |
|
||
| --port | 9621 | RAG server port |
|
||
| --model | mistral-nemo:latest | LLM model name |
|
||
| --embedding-model | bge-m3:latest | Embedding model name |
|
||
| --ollama-host | http://localhost:11434 | Ollama backend URL |
|
||
| --working-dir | ./rag_storage | Working directory for RAG |
|
||
| --max-async | 4 | Maximum async operations |
|
||
| --max-tokens | 32768 | Maximum token size |
|
||
| --embedding-dim | 1024 | Embedding dimensions |
|
||
| --max-embed-tokens | 8192 | Maximum embedding token size |
|
||
| --input-file | ./book.txt | Initial input file |
|
||
| --log-level | INFO | Logging level |
|
||
|
||
#### OpenAI Server Options
|
||
|
||
| Parameter | Default | Description |
|
||
|-----------|---------|-------------|
|
||
| --host | 0.0.0.0 | RAG server host |
|
||
| --port | 9621 | RAG server port |
|
||
| --model | gpt-4 | OpenAI model name |
|
||
| --embedding-model | text-embedding-3-large | OpenAI embedding model |
|
||
| --working-dir | ./rag_storage | Working directory for RAG |
|
||
| --max-tokens | 32768 | Maximum token size |
|
||
| --max-embed-tokens | 8192 | Maximum embedding token size |
|
||
| --input-dir | ./inputs | Input directory for documents |
|
||
| --log-level | INFO | Logging level |
|
||
|
||
#### OpenAI AZURE Server Options
|
||
|
||
| Parameter | Default | Description |
|
||
|-----------|---------|-------------|
|
||
| --host | 0.0.0.0 | Server host |
|
||
| --port | 9621 | Server port |
|
||
| --model | gpt-4 | OpenAI model name |
|
||
| --embedding-model | text-embedding-3-large | OpenAI embedding model |
|
||
| --working-dir | ./rag_storage | Working directory for RAG |
|
||
| --max-tokens | 32768 | Maximum token size |
|
||
| --max-embed-tokens | 8192 | Maximum embedding token size |
|
||
| --input-dir | ./inputs | Input directory for documents |
|
||
| --enable-cache | True | Enable response cache |
|
||
| --log-level | INFO | Logging level |
|
||
|
||
|
||
### Example Usage
|
||
|
||
#### LoLLMs RAG Server
|
||
|
||
```bash
|
||
# Custom configuration with specific model and working directory
|
||
lollms-lightrag-server --model mistral-nemo --port 8080 --working-dir ./custom_rag
|
||
|
||
# Using specific models (ensure they are installed in your LoLLMs instance)
|
||
lollms-lightrag-server --model mistral-nemo:latest --embedding-model bge-m3 --embedding-dim 1024
|
||
```
|
||
|
||
#### Ollama RAG Server
|
||
|
||
```bash
|
||
# Custom configuration with specific model and working directory
|
||
ollama-lightrag-server --model mistral-nemo:latest --port 8080 --working-dir ./custom_rag
|
||
|
||
# Using specific models (ensure they are installed in your Ollama instance)
|
||
ollama-lightrag-server --model mistral-nemo:latest --embedding-model bge-m3 --embedding-dim 1024
|
||
```
|
||
|
||
#### OpenAI RAG Server
|
||
|
||
```bash
|
||
# Using GPT-4 with text-embedding-3-large
|
||
openai-lightrag-server --port 9624 --model gpt-4 --embedding-model text-embedding-3-large
|
||
```
|
||
#### Azure OpenAI RAG Server
|
||
```bash
|
||
# Using GPT-4 with text-embedding-3-large
|
||
azure-openai-lightrag-server --model gpt-4o --port 8080 --working-dir ./custom_rag --embedding-model text-embedding-3-large
|
||
```
|
||
|
||
|
||
**Important Notes:**
|
||
- For LoLLMs: Make sure the specified models are installed in your LoLLMs instance
|
||
- For Ollama: Make sure the specified models are installed in your Ollama instance
|
||
- For OpenAI: Ensure you have set up your OPENAI_API_KEY environment variable
|
||
- For Azure OpenAI: Build and configure your server as stated in the Prequisites section
|
||
|
||
For help on any server, use the --help flag:
|
||
```bash
|
||
lollms-lightrag-server --help
|
||
ollama-lightrag-server --help
|
||
openai-lightrag-server --help
|
||
azure-openai-lightrag-server --help
|
||
```
|
||
|
||
Note: If you don't need the API functionality, you can install the base package without API support using:
|
||
```bash
|
||
pip install lightrag-hku
|
||
```
|
||
|
||
## API Endpoints
|
||
|
||
All servers (LoLLMs, Ollama, OpenAI and Azure OpenAI) provide the same REST API endpoints for RAG functionality.
|
||
|
||
### Query Endpoints
|
||
|
||
#### POST /query
|
||
Query the RAG system with options for different search modes.
|
||
|
||
```bash
|
||
curl -X POST "http://localhost:9621/query" \
|
||
-H "Content-Type: application/json" \
|
||
-d '{"query": "Your question here", "mode": "hybrid"}'
|
||
```
|
||
|
||
#### POST /query/stream
|
||
Stream responses from the RAG system.
|
||
|
||
```bash
|
||
curl -X POST "http://localhost:9621/query/stream" \
|
||
-H "Content-Type: application/json" \
|
||
-d '{"query": "Your question here", "mode": "hybrid"}'
|
||
```
|
||
|
||
### Document Management Endpoints
|
||
|
||
#### POST /documents/text
|
||
Insert text directly into the RAG system.
|
||
|
||
```bash
|
||
curl -X POST "http://localhost:9621/documents/text" \
|
||
-H "Content-Type: application/json" \
|
||
-d '{"text": "Your text content here", "description": "Optional description"}'
|
||
```
|
||
|
||
#### POST /documents/file
|
||
Upload a single file to the RAG system.
|
||
|
||
```bash
|
||
curl -X POST "http://localhost:9621/documents/file" \
|
||
-F "file=@/path/to/your/document.txt" \
|
||
-F "description=Optional description"
|
||
```
|
||
|
||
#### POST /documents/batch
|
||
Upload multiple files at once.
|
||
|
||
```bash
|
||
curl -X POST "http://localhost:9621/documents/batch" \
|
||
-F "files=@/path/to/doc1.txt" \
|
||
-F "files=@/path/to/doc2.txt"
|
||
```
|
||
|
||
#### DELETE /documents
|
||
Clear all documents from the RAG system.
|
||
|
||
```bash
|
||
curl -X DELETE "http://localhost:9621/documents"
|
||
```
|
||
|
||
### Utility Endpoints
|
||
|
||
#### GET /health
|
||
Check server health and configuration.
|
||
|
||
```bash
|
||
curl "http://localhost:9621/health"
|
||
```
|
||
|
||
## Development
|
||
|
||
### Running in Development Mode
|
||
|
||
For LoLLMs:
|
||
```bash
|
||
uvicorn lollms_lightrag_server:app --reload --port 9621
|
||
```
|
||
|
||
For Ollama:
|
||
```bash
|
||
uvicorn ollama_lightrag_server:app --reload --port 9621
|
||
```
|
||
|
||
For OpenAI:
|
||
```bash
|
||
uvicorn openai_lightrag_server:app --reload --port 9621
|
||
```
|
||
For Azure OpenAI:
|
||
```bash
|
||
uvicorn azure_openai_lightrag_server:app --reload --port 9621
|
||
```
|
||
### API Documentation
|
||
|
||
When any server is running, visit:
|
||
- Swagger UI: http://localhost:9621/docs
|
||
- ReDoc: http://localhost:9621/redoc
|
||
|
||
### Testing API Endpoints
|
||
|
||
You can test the API endpoints using the provided curl commands or through the Swagger UI interface. Make sure to:
|
||
1. Start the appropriate backend service (LoLLMs, Ollama, or OpenAI)
|
||
2. Start the RAG server
|
||
3. Upload some documents using the document management endpoints
|
||
4. Query the system using the query endpoints
|
||
|
||
### Important Features
|
||
|
||
#### Automatic Document Vectorization
|
||
When starting any of the servers with the `--input-dir` parameter, the system will automatically:
|
||
1. Scan the specified directory for documents
|
||
2. Check for existing vectorized content in the database
|
||
3. Only vectorize new documents that aren't already in the database
|
||
4. Make all content immediately available for RAG queries
|
||
|
||
This intelligent caching mechanism:
|
||
- Prevents unnecessary re-vectorization of existing documents
|
||
- Reduces startup time for subsequent runs
|
||
- Preserves system resources
|
||
- Maintains consistency across restarts
|
||
|
||
### Example Usage
|
||
|
||
#### LoLLMs RAG Server
|
||
|
||
```bash
|
||
# Start server with automatic document vectorization
|
||
# Only new documents will be vectorized, existing ones will be loaded from cache
|
||
lollms-lightrag-server --input-dir ./my_documents --port 8080
|
||
```
|
||
|
||
#### Ollama RAG Server
|
||
|
||
```bash
|
||
# Start server with automatic document vectorization
|
||
# Previously vectorized documents will be loaded from the database
|
||
ollama-lightrag-server --input-dir ./my_documents --port 8080
|
||
```
|
||
|
||
#### OpenAI RAG Server
|
||
|
||
```bash
|
||
# Start server with automatic document vectorization
|
||
# Existing documents are retrieved from cache, only new ones are processed
|
||
openai-lightrag-server --input-dir ./my_documents --port 9624
|
||
```
|
||
|
||
#### Azure OpenAI RAG Server
|
||
|
||
```bash
|
||
# Start server with automatic document vectorization
|
||
# Existing documents are retrieved from cache, only new ones are processed
|
||
azure-openai-lightrag-server --input-dir ./my_documents --port 9624
|
||
```
|
||
|
||
**Important Notes:**
|
||
- The `--input-dir` parameter enables automatic document processing at startup
|
||
- Documents already in the database are not re-vectorized
|
||
- Only new documents in the input directory will be processed
|
||
- This optimization significantly reduces startup time for subsequent runs
|
||
- The working directory (`--working-dir`) stores the vectorized documents database
|
||
|
||
## Star History
|
||
|
||
<a href="https://star-history.com/#HKUDS/LightRAG&Date">
|
||
<picture>
|
||
<source media="(prefers-color-scheme: dark)" srcset="https://api.star-history.com/svg?repos=HKUDS/LightRAG&type=Date&theme=dark" />
|
||
<source media="(prefers-color-scheme: light)" srcset="https://api.star-history.com/svg?repos=HKUDS/LightRAG&type=Date" />
|
||
<img alt="Star History Chart" src="https://api.star-history.com/svg?repos=HKUDS/LightRAG&type=Date" />
|
||
</picture>
|
||
</a>
|
||
|
||
## Contribution
|
||
|
||
Thank you to all our contributors!
|
||
|
||
<a href="https://github.com/HKUDS/LightRAG/graphs/contributors">
|
||
<img src="https://contrib.rocks/image?repo=HKUDS/LightRAG" />
|
||
</a>
|
||
|
||
## 🌟Citation
|
||
|
||
```python
|
||
@article{guo2024lightrag,
|
||
title={LightRAG: Simple and Fast Retrieval-Augmented Generation},
|
||
author={Zirui Guo and Lianghao Xia and Yanhua Yu and Tu Ao and Chao Huang},
|
||
year={2024},
|
||
eprint={2410.05779},
|
||
archivePrefix={arXiv},
|
||
primaryClass={cs.IR}
|
||
}
|
||
```
|
||
**Thank you for your interest in our work!**
|